Requirements
- Windows PC
- USB data cable
- Find Odin Firmware Files
- Extract the Firmware Files
- Install the Right Drivers
- Install Odin on Your PC
- Put Your Phone in Download Mode & Connect to PC
- Flash the Firmware Files
And you may wonder…
There is one direct and most effective solution for both – that is to flash the Stock/Official ROM (original firmware) via specific tools.
This tutorial can also be followed to…
If you have used Kingo Android Root already, skip this step. Otherwise, do it manually. Following are ways to do this…
Once drivers are installed or updated, it is highly recommended that you restart your computer.
SamMobile may be the best choice to download stock firmware of Samsung device. Or you can go to Samsung Updates, XDA Forum or Google to find the correspondent firmware of your device.
Click “Firmware” and enter your device model, Select country or type in certain info to filter, eg.Baseband version.
After downloading it (normally a compressed file), you need to extract/unzip it to a certain location of your PC. The file types that Odin uses are *.bin,*.tar and *.tar.md5.

Find the file you have downloaded and then unzip it to Desktop.

You will find a *.md5 file after extracting.
You can download Odin V3.10.7 directly from SamMobile. AndroidMTK is a fine alternative, it also offers a detailed list of Odin versions and downloads link. Or you can always Google “Odin download”. After downloading it on your PC, extract it to Desktop or another location you’d prefer.
Odin v3.10.7 zip file.
After extracting, right-click to “Open as Administrator”. It may prevent certain issue from happening.

Run Odin as administrator is recommended.
Follow these steps to enter Download Mode/Odin Mode

Warning before entering into download mode

Now you are in download mode.
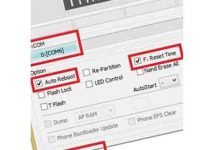
You device should be automatically recognized by Odin. At the lower-left of Odin interface, it should show a message that says “Added!” and in the meantime you should see a light-blue box at the ID:COM section stating “COM:3” (the number depend on which USB port you have plugged the device cable and is irrelevant).

Device is connected to Odin.
Whether it is “PDA” or “AP” depends on the version of Odin that you used. But the md5 file goes to either “PDA” or “AP”.

Add *.md5 to Odin.
After adding the file, click “Start” to begin the flashing process.

Click “Start” to flash.
WARNING DO NOT REMOVE OR OPERATE ON YOUR DEVICE UNTIL FINISHED OR FAILED IS SHOWED ON ODIN.

Ongoing flashing process. Do not remove your device.
When the flashing process is done and if everything goes well, you should see a big green box saying “RESET” or “PASSED” (depends on the version of Odin is used). By now, the device should be rebooted and it is safe to remove/unplug your device.

Flash succeeded.
Try these things first:

We provide combination firmware file for Samsung mobiles. for Samsung Galaxy Combination Firmware Files ROM a310 a510s a520l a710k a910f g530 S6 edge g925p S7 g930s g935s g920t g935t S8 g950u S8+ Plus S9 and S9 Plus, Note 9 Note8. Combination firmware is a ROM for developers or engineers they run the device also can fully read and test the equipment of the device.
If some one wants expert view regarding blogging then i
propose him/her to visit this blog, Keep up the fastidious work.
If you would like to take much from this paragraph
then you have to apply these methods to your won webpage.
Hello there, You’ve done a fantastic job. I’ll definitely
digg it and personally recommend to my friends. I’m sure they will be
benefited from this web site.
There is certainly a great deal to find out about this issue.
I really like all of the points you have made.
I got this web page from my pal who told me on the topic of this website and now
this time I am browsing this site and reading very informative articles
at this time.
Heya i am for the primary time here. I came across this board and I to find It really useful & it helped
me out much. I hope to offer one thing again and help others
such as you aided me.
Thanks very interesting blog!
buena noche necesito un filware
Vous avez oublié un point important. Les erreurs d’orthographe, les erreurs de syntaxes, les échanges alambiquées et, bien pires, les
erreurs de copie sont des défauts rédhibitoires.
Toutes choses dont sont truffés vos contenus. Pensez à bien relire et même à faire relire chaque billet par
quelques personnes de votre environnement avant sa publication. En général, un site qui présente
ces défauts ne me constate pas revenir. Bon courage.
Vous avez oublié un point fondamental. Les fautes d’orthographe, les erreurs de
syntaxes, les phrases alambiquées et, bien pires, les fautes
de copie sont des défauts rédhibitoires.
Toutes choses dont sont truffés vos articles. Pensez à bien relire voire même à faire
relire chaque billet par une ou deux personnes de votre environnement
avant sa publication. En général, un site internet qui présente ces défauts ne
me aperçoit pas revenir. Bon courage.
Vous avez oublié un point essentiel. Les fautes d’orthographe, les erreurs de syntaxes, les
phrases alambiquées et, bien pires, les erreurs de copie sont des défauts rédhibitoires.
Toutes choses dont sont truffés vos articles. Pensez
à bien relire voire même à faire relire chaque billet par
une ou deux personnes de votre entourage avant sa publication. En général, un site internet
qui présente ces défauts ne me constate pas revenir.
Bon courage.
507947 840475Thank you, Ive just been searching for information about this topic for a while and yours is the greatest Ive discovered till now. But, what in regards to the conclusion? Are you sure concerning the supply? 3101